A crazy thing happened. I caught up completely, and it’s time to decorate this room. Next week might be my first ever stress-free reveal, or I may have just jinxed myself. We will all know soon. I’m indeed two days behind with this update post, but working on the room was the priority.

Miss an update? Catch up here: week one :: week two :: week three :: week four
Last week, I finished the mural, and it was so lovely to read all the kind comments. I still have an IGTV video about the entire process in the works. During week five, I committed to finishing the headboard and cleaning up the construction debris.
The Headboard
This post contains affiliate links.
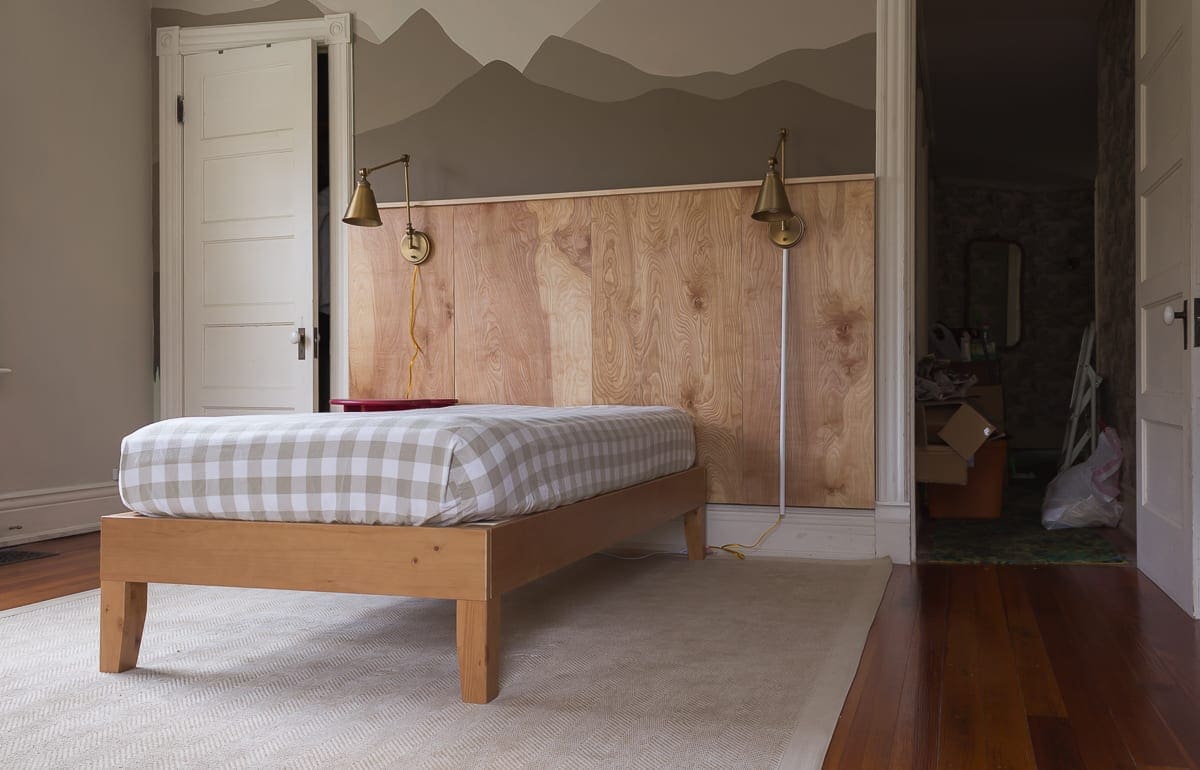
Overall, the headboard came together quickly, but I did make some mistakes. The first mistake was using 1/4″ birch plywood panels. Lowe’s was out of 1/2″, and the 3/4″ pieces were way too heavy. I needed to be able to build, maneuver, and hang the headboard by myself. In hindsight, I should have shopped around at other stores.
The headboard worked because I beefed up the frame, but 1/2″ plywood minimum, would have been much better and sturdier for fulltime use. If there is interest, I can write up a DIY tutorial. There will be plenty of room in it for creativity.
For reference, this was the inspiration photo:

Photographed by Djan Chu
After getting to the basic headboard stage, I took a long hard look at everything. The mural sides of the room with the bed were starting to look very heavy. Sometimes I like to think of these spaces as if they were boats. Too much decor on one side tips the boat over. So, I scrapped the floating nightstand idea and brought in this cute little drop leaf table instead.
Leaving the floating nightstands off makes the entire headboard more flexible too. We can switch to a full or queen-sized bed someday.

The sconces in the warm brass finish are something I bought for this room almost a year ago, and they are currently on sale for $112 each! I know I did not pay the full price of $225 each, but I think I spent more than $112 each. They can be hardwired or plugged into an outlet. Flexibility like that is so important in an old house.
The bed frame came from Amazon. This twin-sized platform is so sturdy, and it was effortless to put together. I have no idea why I ever bothered with metal Hollywood bed frames. This wood one is so much better.
IKEA KALLIX Update
On the whole, the decor in this room is a significant departure from my typical BHH style, but since it’s a bedroom, I feel more freedom to play. At this point in the project, I am also doing the equivalent of a fridge cleanout. However, instead of the fridge, I’m cleaning out the basement.
Since I ran out of money and time to build a bookshelf, I decided to modify the IKEA KALLIX that came out of this room. We have had this unit for years–at least ten or more.
After I built the headboard, I had some leftover wood. Rather than take it back to Lowe’s, I ripped it to the exact width and length of all four sides of the KALLIX. I used my friend Dale’s table saw to make perfect cuts.
Pro tip: Decide which pieces, top and bottom or sides, will overlap. Once you decide, be sure to add the extra amount of the width of the wood to your overall measurement. For instance, since I wanted my top to overlap the side panels, I added 1/2″ to my top piece to account for the extra 1/4″ thickness on each side panel.
Next, I removed the little screw cover caps to make the sides as smooth as possible.

After, I dotted on a liberal amount of construction adhesive and set the wood in place.

Then, I shot a few 3/4″ brads in for extra stability and clamped each piece until the adhesive cured.

When I completed that process on all four sides, I added some cute little copper hairpin legs that I have had in the basement for almost three years. My sister gave me a gift certificate to Etsy one year for my birthday, and that’s what I bought.
The person who made them has only table length in stock, but here is another seller who offers a variety of finish options and sizes.

Lastly, just like the headboard, I spread on a coat of satin poly to protect the wood and give it a slight sheen.

Ready For Decor
With all of the main projects completed, it’s time to start decorating. I have never gone into week six this ready. I am typically still putting a room together on reveal day and simultaneously hiding bags of trash. I hardly know how to handle this new turn of events. It’s a good feeling–much less stressful.
Before the big reveal, I will style this little piece.

I also need to finish the cord covers for the sconces and figure out the linens for the bed.

There is plenty of wall space left to fill too.

Have a great weekend, and thank you for patiently waiting for this blog post. Be sure to visit the One Room Challenge blog for everyone else’s update too.
I am so excited to share the finished Cabin Vibes Bedroom next week. See you then!


8 Comments
Barbara H.
Hope your progress continues and you have a fun week of finishing up. It’s looking good. I wasn’t sure about how you finished the headboard but I like it. Genius to add the legs to the Ikea piece.
Stacy
Thank you, Barbara!
SH
Looks like you are cruising into home plate on this ORC (hey, our team won the World Series!). I am excited to see the final reveal–what a warm and cozy spot.
Stacy
Is your team the Nationals? If so, congratulations!!
Downraspberrylane
Fabulous as usual. The book case makeover is genius. Not that you asked my opinion, but I still would like to see the floating shelves for nightstands ?. This room looks very calming.
Stacy
Thank you! I can always add the floating shelves later. It just felt right to skip them for now.
Jen
So exciting! The headboard looks great and I think you’re right about not doing the floating nightstands, this will be much more flexible for the future.
Also, “simultaneously hiding bags of trash” I have NO IDEA what you’re talking about. Also, please do not ask to see pictures of my living room, bathroom, and hallway outside my ORC bedroom.
Stacy
Haha! Carefully cropped photos are the way of the One Room Challenge. 🙂