In 2014, when we moved into the house, the walls in the boys’ rooms were a mess, and fixing plaster cracks was pretty much our very first DIY job here. Then, we did have a wee cave-in of the ceiling in the living room in 2015, but overall, we hit the old house lottery in this department. Of all the problems we have in BHH, happily damaged plaster has not been one of the major ones. Since that is the case, I’ve been using a hybrid approach to repair plaster.
Last month, I started painting the living room bookshelves, and I found a few damaged plaster sections. I mentioned it on Instagram, and there were several requests to share the plaster repair process. This how-to post should get you started off on the right foot, whether you want to use my hybrid approach or stick to only traditional materials.
Edited 6/24/20 – I had a great conversation with Phoenix Restoration. When I wrote this post, I didn’t really pay attention to the fact that Plaster of Paris is a gypsum plaster vs. lime plaster. Gypsum plaster does not function the same way as old-fashioned lime plaster. It will simply wash away if water becomes an issue, whereas lime plaster holds up. Because I now know better, I wouldn’t recommend Plaster of Paris for any sort of large job–maybe a nail hole or two. To be honest, I mostly use joint compound for small repairs. However, I will be adding some lime plaster from Limeworks.us to my basement supply shelves. My apologies for not providing the very best information, and thank you to John from Phoenix Restoration for helping me learn.

How to Repair Plaster
This post contains affiliate links.
Supplies:
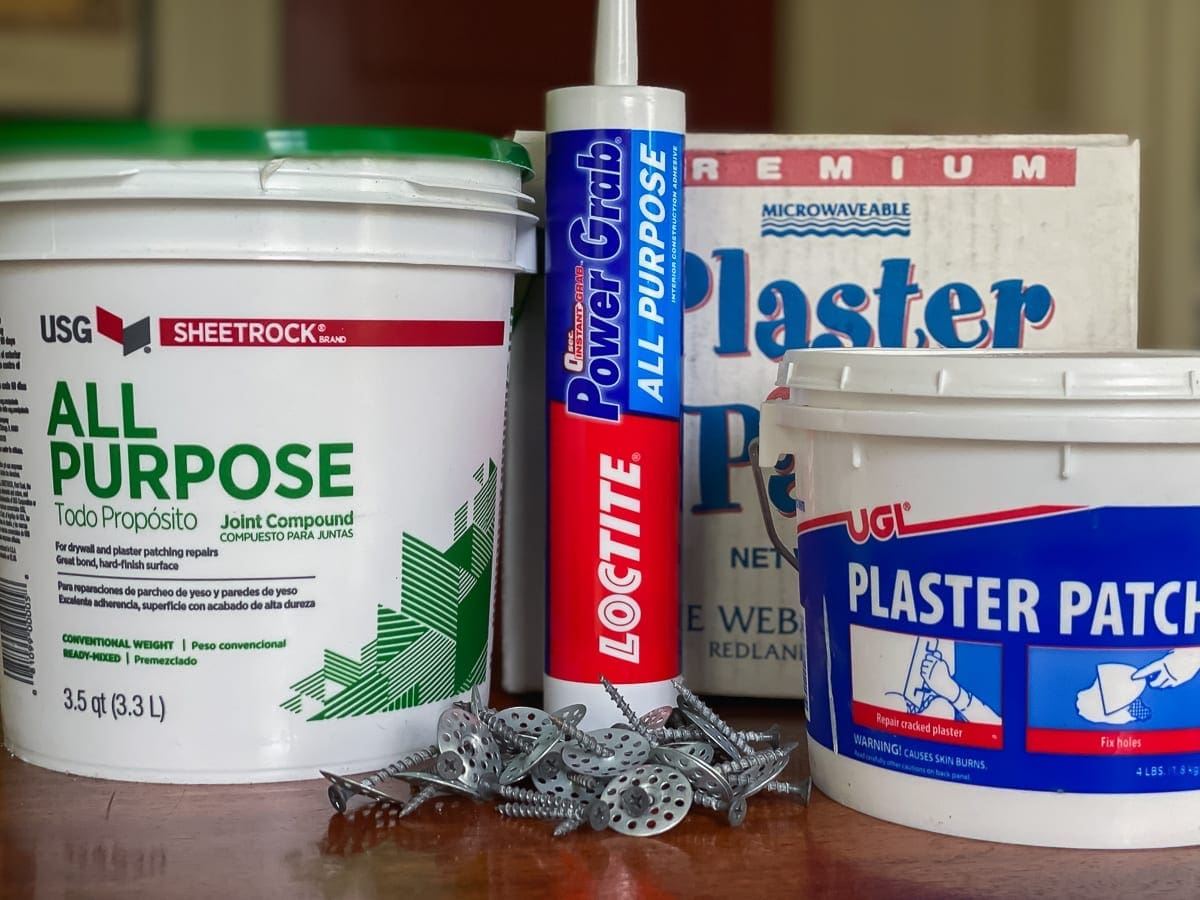
- 4″ putty knife, or your preference of tools for spreading wall patch
- Drill and 3/16″ masonry drill bit
- Plaster washers and screws
- PVA glue – I use plain old Elmer’s school glue
- Plastic syringes or a spray bottle – Syringes work best.
- Construction adhesive – My favorite brand is Loctite Power Grab. The formula works for many applications, including plaster.
- UGL Plaster patch
- Joint Compound (linking my favorite brand) or Plaster of Paris
Step 1:
Remove all of the loose plaster. I often use a shop vac and a scraper for this task.
Step 2:
Using a 3/16″ masonry bit, drill holes, every 2-3 inches, approximately 1″ away from the crack on both sides and all the way around any missing chunks of plaster. You may lose more plaster during this process, but that is normal. Simply incorporate the new sections into the repair.


The masonry bit will go through the plaster and bump up against the lath. If your drill bit goes between the lath, use a pencil to mark that hole with an X.

Step 3:
Mix a 50/50 ratio of PVA glue and water in a small container. Fill a syringe or spray bottle with the glue mixture, and squeeze or spray it into the holes. If the plaster cracks are very minor, I often skip this step.


The idea behind using the PVA water and glue mixture is that it will make the dust and debris behind the plaster congeal so that the adhesive will adhere with the most durable bond.
This step can be messy, especially if you are working on a ceiling. The glue mixture may pour out of the holes, so keep damp rags handy.
Let the glue mixture dry for a couple of hours.
Step 4:
Squeeze a generous portion of construction adhesive into every hole that is not marked with an X.

Apply adhesive liberally all the way around the edges of any missing plaster chunks.

After you apply the adhesive, fasten screws and plaster caps through the crack and into the lath, tightening gently.

Add screws and caps around the edges of the large, missing sections to draw the edges and adhesive firmly to the lath.

As the caps tighten against the plaster and pull it back to the lath, some adhesive may ooze out. Wipe it off the wall with a rag before it dries.
When the adhesive is dry, remove the screws and caps. You can reuse them many times.
Step 5:
Mix up some powdered plaster patch with water according to the package directions. I use UGL (shown below), which is a glue-based product that does not shrink.

I cannot believe I did not take photos to demonstrate the next part of this project. I am so sorry. Some day I will get the hang of this blogging thing. Hopefully, my directions will suffice.
For smooth walls, apply the plaster patch to the missing sections only, pressing it through the lath just like an old-fashioned scratch coat. You may score it if you like. For textured walls, you may press plaster patch into the holes you drilled too.
When the “scratch coat” is dry, apply a second coat almost even with the wall. This coat functions as your brown coat.
If your plaster walls are textured, you might use the UGL plaster patch as your finish coat too. It has a sandy feel to it. If you have smooth walls like I do, the finish coat will be joint compound, which is definitely not a plaster restoration product, OR Plaster of Paris, which can be.
For the finish coat, fill all the holes and cracks to bring the entire repaired section level with the smooth walls. Use long, confident strokes, and smooth out your putty knife marks as you go. Imperfections can be sanded, but the less sanding you have to do, the better.

Tip: Plaster of Paris dries lightning fast. Mix up a small batch at first until you get used to the mixing, application, and drying process.
Once the finish coat dries, apply more as necessary or hand sand the entire area to a smooth finish.
When the repair is complete, continue with your plans to paint or wallpaper. For these bookshelves, I painted a faux bois effect.
Final Thoughts
Some people like using a finishing trowel and a hawk as tools to apply the final coat. I find both to be too large and heavy for my dainty lady hands and T-rex arms. Instead, I use a 4″ putty knife. For a full wall or large section, it would probably be time to toughen up buttercup, because using a 4″ putty knife would be a ridiculous waste of time.
For a much larger plaster repair, including walls and ceilings, there are some excellent restoration systems available, such as Big Wally’s and Plaster Magic. These branded products are quite expensive. That’s why for small jobs like the back of my bookshelves, I use this lower-cost, hybrid approach.
If you have any questions, let me know if the comments.

Pin it for later!


16 Comments
Aileen
I used Big Wally’s method (which is very similar to yours, except you have to buy his products) and it does work, but OMG, repairing old plaster has got to be one of the messiest, most discouraging old house jobs out there. I really struggled to get a smooth surface on my final coat, and I’m not sure what can explain my difficulty, other than inexperience, and, like you, dainty lady arms, lol. At least I ended up with a mostly full box of N95 masks that I was able to donate to my husband’s unit in the hospital after covid broke out.
Stacy
Big Wally’s is great! It takes a lot of practice to make a smooth topcoat, and I am still perfecting my technique. 🙂
It sounds like your husband could put those N95s to good use.
Allison
Hi Stacy! Love your blog – I just discovered it today via Vivacious Victorian. Always looking for great old house blogs 🙂 I was wondering if you have a post on the history of your amazing house? I looked around a bit and couldn’t find one. Thank you!
Stacy
Hi Allison, Thank you, and welcome! I love Amy’s blog too. I haven’t written a post on the full history. However, here are two posts about the style of the house and the general history that might appeal to you.
Business in the Front, Party in the Back Part I
Business in the Front, Party in the Back Part II
Troy
I’ve been using Big Wally’s. It’s expensive! Do you think the PowerGrab is as good/strong/durable as Big Wally’s?
To get smooth finish, I use joint compound to fill and once it has dried go over it with a stiff sponge. It takes practice to get the firmness of the sponging down, but I can get a smooth finish in two coats with no sanding.
Stacy
Hi Troy,
I think PowerGrab works very well. I haven’t had any failures. Thanks for the smoothing tips too. 🙂
Grover Garber
One trick I picked up to get a very smooth finish using
premixed joint compound is to mix some water in before application. It’ll give as smooth a surface as the professionally applied plaster top coat. Play around with the amount of water to add.
Stacy
Thanks for the tip, Grover.
Stacey
Great article! Have you done plaster over brick repair? We have plaster over a brick chimney that’s cracking. I’ve done plaster over lath repairs and I’m assuming it’s a similar process, but not sure how to attach/anchor the plaster after the adhesive is in, since I wouldn’t want to try and screw into the brick like I’d normally do with lath. Thanks for any tips!
Stacy
Hi Stacey,
I am so sorry that it took me so long to get back to you. I saved up a lot of office tasks to do while I’m recovering from surgery, but I should have never made you wait so long.
I actually haven’t done plaster over brick, but I bet the crew at LimeworksUS could offer some help. They have a lot of resources on their website, but they are also great at answering questions too. If you need products, they’ll have them.
Good luck, and if you feel like getting back to me, I’d love an update. I will respond much quicker. 🙂
Tracy Hall
Hey there Stacy!
Some of the best info I’ve come across on doing your own plaster repairs without having to buy the expensive premade kits! I saw your edit about the lime-based plaster, but I haven’t been able to determine which product on that website would be appropriate for interior plaster walls. Most of their videos are about exteriors and brick. You said you were going to add some to your basement supply, so I was wondering what product you ended up getting for plaster wall repairs?
One other question… I noticed that you put your washers and screws right into the crack and some others recommend putting them into the holes that you drill for instillation of adhesive on either side of the crack… do you think there is a noticeable difference either way?
Thanks in advance…!
Stacy
Hi Tracy, I am so glad the article is helpful. 🙂 Here is a link to the topcoat I purchased based on the recommendation from Limeworks.US: Ecologic™ PLASTER TOPCOAT™. I also used the Ecologic™ PLASTER TAKCOAT™ for the scratch coat. Regarding your washer and screw question, either way works. I put them in the crack so I can see the adhesive squishing out from the holes. That shows me it is adhering well. Also, I don’t want to disrupt the adhesive when I remove the screws and washers.
Mike
Did you find the consistency of the PowerGrab to be easy to work with? I’ve tried two different adhesives and found that they were far to viscous for this type of work and they just make a huge mess.
Stacy
Hi Mike, The consistency of the Power Grab is excellent. I will say that most bets are off for ceilings. It still comes out when the plaster is pulled to the lathe. However, it’s not a runny mess. Just be sure to keep your cap on. Ha!
Stucco Repair Tucson
The combination of techniques shared in this article offers a practical solution for preserving the integrity of old plaster while ensuring a smooth finish. Perfect for anyone working on a restoration project! Thanks for sharing!
Stucco Portland Oregon
This blog offers a great, practical approach to plaster repair, blending traditional techniques with modern solutions.